


Netbeans no longer comes with Tomcat bundled so if you want to deploy your application to an Tomcat server you need to manually register an external server.
Note: This article is old no longer and this is not true anymore, Tomcat is now bundled with Netbeans so the steps in this tutorial are not needed anymore. You can download and install the bundle from the official page.
Pre-requisites:
I’m assuming you are using at least Ubuntu Linux 11.10 and you already have installed the the latest Netbeans 7.1 with the Java Web Applications plugin installed.
I also assume that you want to install and configure Tomcat from the repository, if you don’t care an easier method would be to just download apache-tomcat.zip from the Tomcat website, extract the archive to a folder under your home directory and just skip to step 4 of this tutorial where Under Server Location you would browse to where you extracted the archive and under Username and Password you would put the username and password you would have put in tomcat-users.xml.
1. Install Tomcat
1 | $ sudo apt-get install tomcat7 tomcat7-common tomcat7-admin tomcat7-user
|
2. Add an administrative user to Tomcat
Tomcat does have any users defined that could be used for administrative purposes so we need to open tomcat-users.xml in a text editor and add a user with the proper roles assigned to it.
1 | $ sudo gedit /etc/tomcat7/tomcat-users.xml
|
Replace its content with the following and make sure that you replace USERNAME and PASSWORD with the values you want:
1 2 3 4 5 6 | <?xml version='1.0' encoding='utf-8'?> <tomcat-users> <role rolename="manager-script"/> <role rolename="admin"/> <user username="USERNAME" password="PASSWORD" roles="manager-script,admin"/> </tomcat-users> |
3. Some “fixes”
Unfortunately it seams that Netbeans doesn’t correctly detect the the Tomcat installation directory so we need to make some temporary changes till we add the server otherwise will get an error saying “The specified Server Location (Catalina Home) folder is not valid.”
1 2 3 | $ cd /usr/share/tomcat7/lib $ mv catalina.jar catalina.jar.bk $ wget http://www.razius.com/files/catalina.jar |
We need to make sure that the configuration files can be read from the installation directory otherwise will get an error saying “The <CATALINA_HOME>/conf/server.xml can’t be read.”
1 | $ sudo ln -s /etc/tomcat7/ /usr/share/tomcat7/conf
|
We need to chown the Tomcat installation and configuration directory so we don’t have any permission problems. Replace USERNAME with your Ubuntu username:
1 2 | $ sudo chown -R USERNAME:USERNAME /etc/tomcat7/ $ sudo chown -R USERNAME:USERNAME /usr/share/tomcat7/ |
Disable the upstart Tomcat service (Netbeans start’s it up for us automatically):
1 | $ sudo update-rc.d tomcat7 disable 0123456 |
4. Adding the server in Netbeans
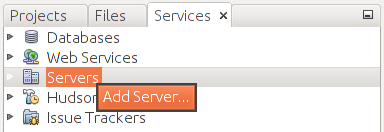
Now that you have Tomcat installed and configured we can open up Netbeans and under the Services tab right click on the Servers node and click on Add server.
In the current list select Apache Tomcat and click Next. Under Server Location enter your Tomcat installation directory , by default this should be /usr/share/tomcat7 and under Username and Password put in the username and password that we added in the tomcat-users.xml file.
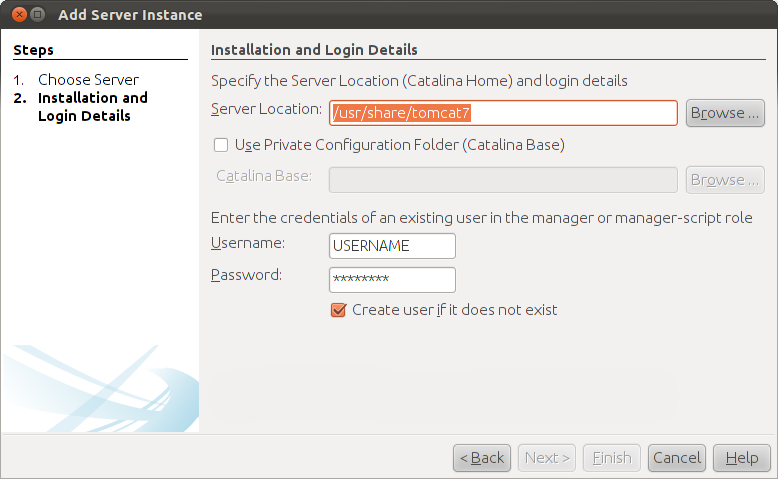
Click Finish. You should now be able to see Tomcat as an added server under the Servers Node.
5. Revert changes
If we are installing from the repository we need to revert the changes done in step 3:
1 2 3 | $ cd /usr/share/tomcat7/lib $ rm catalina.jar $ mv catalina.jar.bk catalina.jar |